

Ambient Weather Network Weather Hub
The AWN Weather Hub receives data from compatible Ambient Weather Stations and Environmental Sensors and discreetly sends it to the Ambient Weather Network over your Wi-Fi or ethernet/LAN connection. This small, sleek hub has LED status indicators, an integrated antenna, and a low-draw power supply. Perfect for users that want access to weather data without installing an array or want to take a non-internet-enabled Ambient Weather Station online.
What is a Weather Hub and How Does it Work?
The AWN Weather Hub receives data from compatible Ambient Weather Stations and Environmental Sensors and discreetly sends it to the Ambient Weather Network over your Wi-Fi or ethernet/LAN connection. This small, sleek hub has LED status indicators, an integrated antenna, and a low-draw power supply.
How Do I View My Data?
Access your data remotely using the Ambient Weather Network App or desktop version by visiting ambientweather.net.
What Sensors Can I Add to My Weather Hub?
Ambient Weather offers a variety of indoor and outdoor environmental sensors, depending on the types of measurements you are looking to monitor. Here are our recommended sensor options and placement in your home:
- WH31E Temperature and Humidity Sensor - Measures outdoor or indoor temperature and humidity. Recommended Placement: Porch, Side of House, Basement, Bedroom, Office, Living Room (Add up to 8 WH31E Sensors)
- WH31P Waterproof Probe Temperature Sensor - Measures the temperature of any wet medium. Recommended Placement: Fish Tanks, Freezer, Refrigerator, Houseplants (Add up to 8 WH31P Sensors)
- AQIN Air Quality Monitor - Measures PM2.5, PM10, and CO2 levels. Recommended Placement: Kitchen, Basement, Office, Bedroom, Living Room (Add up to 3 Air Quality Sensors from any combination of AQIN, PM25, and PM25IN Sensors)
- PM25IN Indoor Particulate Monitor - Measures indoor PM2.5 levels. Recommended Placement: Kitchen, Basement, Office, Bedroom, Living Room (Add up to 3 Air Quality Sensors from any combination of AQIN, PM25, and PM25IN Sensors)
- PM25 Outdoor Particulate Monitor - Measures outdoor PM2.5 levels. Recommended Placement: Porch (Add up to 3 Air Quality Sensors from any combination of AQIN, PM25, and PM25IN Sensors)
- WH31LA Leak Detector - Detects moisture. Recommended Placement: Laundry Room, Kitchen, Bathroom, Basement (Add up to 4 WH31LA Sensors)
- WH31L Lightning Detector - Detects EMP (Electro-Magnetic Pulse) from strikes up to 25 miles away. Recommended Placement: Porch (Add up to 1 WH31L Sensors)
- WH31SM Soil Moisture Sensor - Measures the moisture levels in the soil. Recommended Placement: Houseplants, Garden (Add up to 8 WH31SM Sensors)
- WH31PF Wireless Waterproof Floating Pool and Spa Thermometer - Measures water temperature. Recommended Placement: Pool, Spa, Pond (Add up to 8 WH31PF Sensors)
- WH31SRS Solar Radiation Shield/Outdoor Enclosure for WH31E, WH31P, and WH31L Sensors – Protects the WH31E, WH31P, and WH31L if used outdoors in an uncovered environment.
Optional Weather Stations Supported by the Weather Hub
Optional weather stations that are supported by the Weather Hub and pass through to the Ambient Weather Network include:
- WS-0800
- WS-0900
- WS-1000
- WS-1001
- WS-1002
- WS-1200
- WS-1201
- WS-1400
- WS-1401
- WS-1550
- WS-1551
- WS-3000
- WS-1900
- WeatherBridge Universal Wi-Fi IP Ethernet Server
Advantages of Using a Weather Hub and Ambient Weather Sensors
A Weather Hub paired with Ambient Weather Sensors is a game-changing solution for apartment dwellers and those without yards. With its convenience and affordability, this pairing provides real-time weather data for your home and its surroundings without worrying about where to place a weather station. Any compatible Ambient Weather Sensor will seamlessly connect to the Weather Hub, which then feeds to the powerful Ambient Weather Network platform. From there, you can access all your data, including a hyper-local forecast. Your personal dashboard provides detailed sensor data, current conditions, charts, and the ability to set alerts when thresholds are met.
ObserverIP Dimensions: 3 x 2.5 x 1"
Power Consumption: About 0.8 Watts
Ambient Weather Software
 IP TOOLS 64 bit
(Size: 2.6 MB)
IP TOOLS 64 bit
(Size: 2.6 MB)
Ambient Help Files
Ambient Weather User Manuals
 OBSERVERIP 2.0 USER MANUAL
(Size: 1.7 MB)
OBSERVERIP 2.0 USER MANUAL
(Size: 1.7 MB)
Product Support Questions
Personal Weather Station Comparison Chart: https://ambientweather.com/weather-station-comparison-chart
The following is a comparison of specifications and features for the Ambient Weather station brands.
- Falcon Series
WS-8480

- Observer Series
WS-1201-IP

- Osprey Series
WS-2902C
WS-1900A
WS-1550-IP


- WS-100 Series:
WS-100

- ColorView Series:
WS-50

Each brand shares the same sensor array (Falcon, Osprey, Observer, ColorView), but have different console and Internet features.
... PermalinkThere are two versions of firmware:
- Console Firmware
- WiFi Firmware
The WS-2000 firmware must be updated to the following revisions in order to support the PM25, PM25IN, and AQIN Sensor:
- Firmware Revision Number (console): 1.4.4
- WiFi Firmware: AMBWeatherV4.1.4
To check the firmware version:
How do I Check my Firmware Versions
You must upgrade both versions of firmware for proper PM25 sensor operation:
Console Firmware:
How do I update firmware, WS-2000?
WiFi Firmware:
How do I update WiFi firmware, WS-2000/WS-5000
... PermalinkNote: The WS-0900-IP was discontinued and firmware updates are no longer supported. ONLY use 4.5.8 for a WS-0900-IP
Download Latest Version: 4.6.2
History:
Version 4.6.2
- Fixes PM25IN "0" reading when no sensor registered
Version 4.6.1:
- Added support for the PM2.5 Indoor Sensor
Version 4.5.8:
- Default station changed to WS-1550-IP
- RF Configuration process optimized
- Server LED turns on when reporting to AmbientWeather.net or Wunderground.com. Before, it only turned on with Wunderground.com.
Version 4.5.7:
- Adds support for PM2.5 sensor.
Version 4.5.6:
- Fixes lock up issue introduced in Version 4.5.5.
Version 4.5.5:
- Fixes issue with Relative Pressure Correction that was introduced in Version 4.5.2.
- Adds support of PM2.5 particulate air quality sensor (coming Q2 2019).
- Fixes Rain Event bug.
Version 4.5.2:
- Fixes UV Scaling Error.
- Fixes issue with Daily Rain sometimes not resetting to 0.
Version 4.5.1:
- Added normal / low battery tile.
- Added Event Rain.
- Reduced the number of DNS look ups to once ervery 15 minutes.
Version 4.4.9:
- Fixed issue with rain calibration gain. This update is only required if you set your rain gain to any value other than 1.00.
Version 4.4.7:
- Fixed issue with both outdoor sensor and Channel 1 sensor reporting as outdoor temperature and humidity for WS-0900-IP Weather Stations.
Version 4.4.6:
- Fixed issue with barometer not reporting to WeatherUnderground for WS-0900-IP Weather Stations.
Version 4.4.5:
- You can now add up to 8 additional wireless indoor-outdoor thermo-hygrometers (the model number of the 8-channel sensors is WH31B).
Version 4.4.4:
- Fixes Wunderground.com reboot loop introduced in 4.4.2.
Version 4.4.2:
- Fixes Wunderground.com bug introduced in 4.4.1.
Version 4.4.1:
- There was a wind scaling issue introduced in Version 4.1.4. The wind speed is 0.46 actual wind speed. The work around is to choose the WS-1400-IP weather station instead of the WS-1200-IP.
- The released version was pulled. There was a Wunderground.com reporting bug in the new release.
Version 4.4.0:
- Fixes time stamp issue introduced in Version 4.3.8.
Version 4.3.8:
- Some users have reported conditions where their ObserverIP has become totally, or partially unresponsive (or very slow) to requests for web pages by either a browser, or secondary device (such as WeatherBridge or MeteoBridge, or computer running software that “interrogates” the ObserverIP web pages). In all cases the problem would occur somewhat unpredictably, and was seen as frequent as once a week, but most often less frequently. The problem manifests as web page timeouts, seen by a browser user or by a secondary device or software. Sometimes the problem is transient, sometimes it is (semi) permanent. To recover, the only solution is a “cold restart” which can be affected by removing power from the ObserverIP for 5 seconds, or by pressing the reset button located on the rear of the ObserverIP.
The latest ObserverIP firmware, version 4.3.8, has resolved several issues that related to this problem. In the process of these fixes, we have determined, however that due to fundamental limitations in hardware and firmware, the ObserverIP is not capable of handling more than 4 simultaneous, or overlapping, web page requests without there being a possibility of the stated problem occurring.
This is not a limitation when the ObserverIP is used as advertised, either used stand alone and occasionally observed through a browser (never more than 1 overlapping request), or even if also connected to a single secondary device, provided that such a device is properly programmed to not make more than one simultaneous request. WeatherBridge and MeteoBridge, in recent firmware versions, are known to not do this and are supported secondary devices. When such secondary devices are in use, combined with a browser making requests (automatically or manually) in rapid succession, there is a small possibility of temporarily reaching over the safe limit and slow responses may occur. In such cases a cold restart may be needed.
Users that use the ObserverIP, in particular those that use secondary devices, are encouraged to upgrade to the latest firmware (version 4.3.8 or later), available on the Ambient Weather web site and to not use more than one secondary device.
Version 4.3.6:
- Improves overall stability of uploads to Wunderground.
Version 4.3.1:
- Removes Telnet capability.
Version 4.2.1:
- Resolves bug introduced in 4.2.0.
Version 4.2.0:
- Resolves bug introduced in 4.1.9.
Version 4.1.9:
- Fixed calibration issue with WS-0800-IP only. Would always return invalid. Note that 4.1.9 had a significant bug and will be updated to 4.2.0 shortly.
Version 4.1.8:
- In Version 4.1.0, the update timer for Wunderground.com was mistakenly changed to 60 seconds. The timer has been returned to 14 seconds for wind speed and direction.
Version 4.1.7:
- Fixes small Wunderground formatting error. Does not impact users unless you are attempting to read the string from application you wrote.
Version 4.1.4:
- Now supports WS-1600-IP weather station.
Version 4.1.3:
- Minor cosmetic changes to the user interface.
Version 4.1.2:
- Fixed bug introduced in 4.1.1 where it would not upload to AmbientWeather.net if Wunderground.com was not entered correctly.
Version 4.1.1:
- Removed unnecessary time delay when closing connection to Wunderground.com
- Fixed rain total initial condition issue after power cycle or firmware upgrade.
Version 4.0.8:
- Improved stability and timing issues with Wunderground.com.
Version 4.0.7:
- Fixed minor issue when Wunderground settings are left blank.
Version 4.0.6:
- Fixed issue when Wunderground settings are left blank. The module was still trying to write to Wunderground.com when the fields were blank.
Version 4.0.5:
- Fixed jittery temperature graph with WS-1200-IP and WS-1400-IP introduced in Version 4.0.0.
- Fixed problem with outdoor LED flashing when WS-1200-IP is selected.
- Fixed lost outdoor sensor reception issue introduced in Version 4.0.0.
- Incorrectly displaying “invalid” for MAC address when no Wunderground.com settings are defined on the network panel.
Version 4.0.3:
- Fixes bugs related with WS-0800-IP and WS-0900-IP when reporting to AmbientWeather.net.
Version 4.0.1:
- Adds support new hosting service, AmbientWeather.net. To register, visit: AmbientWeather.net
- AmbientWeather.net supports indoor and outdoor parameters with a mobile friendly interface.
- Send email and text message alerts.
- Features robust graphing features and data analysis.
- Fixes issue when static IP address option is selected.
- Cleaned up code to run faster.
Version 4.0.0 (beta):
- Supports new hosting service, AmbientWeather.net. To register, visit: AmbientWeather.net
- AmbientWeather.net supports indoor and outdoor parameters with a mobile friendly interface.
- Send email and text message alerts.
- Features robust graphing features and data analysis.
Version 3.1.8:
- Reduced bandwidth usage with Wunderground.com, removing some duplicate transmissions
- Reduced network socket resource consumption by closing socket immediately after response from Wunderground.com. Wunderground.com is no longer contacted if the Station ID and/or Password is empty.
- Time is now set from Wunderground.com whether or not a correct Station ID and Password is supplied.
- Overall network traffic improvements, also resulting in more timely updates to Wunderground.com where occasionally an update interval could be missed.
Version 3.1.6:
- Final fix for Wundeground March 1 update (see 3.1.3 and 3.1.4).
- Turns off uploads to Wunderground if Station ID is blank.
- Fixes bug when switching between static and DHCP. The DNS was not properly addressed.
Version 3.1.4:
- On March 1, 2017, Amazon Web Services’ servers slowed down to requiring up to 30 seconds to open, read, write and close TCPIP sessions. This causes other tasks to slow down, and manifests itself in the indoor temperature-humidity-barometer to act sporadically, or updates to slow or completely stop. This version changes how the connection is established.
Version 3.1.3:
- On March 1, 2017, Amazon Web Services’ servers slowed down to requiring 5 seconds to open an http session. This causes other tasks to slow down, and manifests itself in the indoor temperature-humidity-barometer to act sporadically. This version did not completely resolve this issue. See Version 3.1.4.
Version 3.1.2:
- On January 31, 2017, Weather Underground.com migrated their data center from their offices in San Francisco to Amazon Web Services in Seattle. The firmware did not work properly if you selected a static IP address for the ObserverIP. We will need to fix this by installing Firmware Version 3.1.2.
Version 3.1.0:
- Humidity calibration range issue was not fixed in 3.0.9. This version fixes it.
Version 3.0.9:
- Increases calibration range for humidity from ±10% to ±50%.
Version 3.0.8:
- Fixes issue with Port 80 being left open after an http write command. This slows down the ObserverIP connection.
Version 3.0.3:
- Allows you to re-enter the daily, weekly, monthly and yearly rain totals, which is useful if you clean the rain gauge or replace the batteries and record false rain in the process.
Version 3.0.2:
- Allows multiple browsers open communicating to the same IP Module (in the event you are reviewing from two different computers).
Version 3.0.0:
- Improved update rates due to efficiency changes.
Version 2.1.0:
- If IP connection lost for 20 minutes, resets ObserverIP.
Version 2.0.0:
- Fixed issue with stopped Wunderground.com updates.
- Fixed issue with not accepting “&” character is password.
Version 1.0.9:
- Increased password length from 15 characters to 50 characters.
Version 1.0.8:
- Added Rain Reset button to bottom of Live Data panel. This reset allows you to clear rain totals that may have occurred due to vibration during installation.
- The sea-level barometer adjustment range was not large enough for altitudes above 1,000 feet.
- If the module was powered down and up again, it would lose the Daylight Savings Time setting.
To view your current version of firmware, access you IP Module through the IP address. The firmware version is shown in the upper right hand corner of the display. The version shown in the figure below is 4.0.0.

For instructions on updating the firmware, visit the following link:
https://www.ambientweather.com/observerip.html
To access the files as well as a file history, visit:
- Note for Windows (Mac users can proceed directly to #2:To update the firmware, you may be required to turn off the firewall settings for the IPTools program (IPSE).Open Windows Firewall by clicking the Start button Picture at the bottom left hand corner of Windows, clicking Control Panel, clicking Security Center, and then clicking Windows Firewall.Click Change Settings and the Exceptions tab, and check all instances of IPSE as an exception to allow the program to communicate through the windows firewall. Press OK to save changes.

- Make sure your computer and OberverIP are connected to the same router prior to upgrading the firmware (avoid WiFi and switches).
- If you have not done so already, download the latest IP Tools and firmware here:http://www.ambientweather.com/observerip.html
- Run IPtools from your desktop.

- Select Search. Select the device and choose the Upgrade button.
- Select File and browse to the location on your computer where you downloaded the firmware.
Select the Upgrade Firmware button. The following will be displayed:DHCP server @ 192.168.0.xxx is running on UDP port 67 successfully.
TFTP server @ 192.168.0.xxx is running on UDP port 69 successfully. - The status bar will reach 100% if properly upgraded.

- Press Exit once completed.
- Press the reset button on the back of the IP Module.
- The IP Module will reboot. Press Search until the module is available again on your network.
- Re-enter your Station Type in the Station Settings panel.
- Re-enter your Weather Underground.com Station ID and Station Key in the Weather Network panel.
- If the procedure is unsuccessful, visit: www.AmbientWeather.com/rma.html and we will update the module for you.
- You must be connected to the same Local Area Network. Make sure both your computer and IP module are connected to the same router. Eliminate any switches. Make sure the computer is not communicating via WiFi and plugged directly into the same router.
- There may be an IP conflict. Press the RESET pinhole on the back of the IP Module (#9, figure below).
NOTE: If you cannot open the connection in a web browser, and the IP address of the device ends in xxx.xxx.xxx.99, this will resolve the issue.
Once reset, wait a couple of minutes, relaunch IP Tools to find the new IP address.
- Reboot your router.
- There may be a firewall setting in Microsoft Windows.Open Windows Firewall by clicking the Start button Picture at the bottom left hand corner of Windows, clicking Control Panel, clicking Security Center, and then clicking Windows Firewall.Click Change Settings and the Exceptions tab, and check all instances of IPSE as an exception to allow the program to communicate through the windows firewall.

- Try a third party scan tool. These tools find all of the devices connected to your Local Area Network (LAN).
Some examples are: Windows IP Scan Tool
 Apple IP Scan Tool for iPhone, iPad, and iPod Touch
 Apple IP Scan Tool
 Linux IP Scan Tool
 Android IP Scan ToolThe example below is for Advanced IP Scanner for Windows. Look for the Manufacturer ASIX ELECTRONICS CORP. with the MAC matching the label on the bottom of the IP Module:
Type this IP address into your web browser. For example, type http://192.168.0.55 into your favorite browser. - Switch ports on the router. Switch the cable out connected to the router. If the problem persists:
- Contact support@ambientweather.com for further assistance.
The ObserverIP range modules require Version 4.5.7 or greater to support PM25, PM25IN and AQIN Sensors
To update your firmware, please visit:
How Do I Update The Firmware For The ObserverIP Module?
How Do I Update The Firmware For The ObserverIP 2.0 Module?
To find the MAC address of your IP Module:
- It is printed on the bottom of the IP Module on a sticker.
Example: 00:0E:C6:D9:02:B4 (yours will be different).
or: - Go to the Weather Network panel on your IP Module:
On September 5, 2018, AmbientWeather.net moved the website to a different hosting service.
This may cause updates to cease if the DNS is cached on your device, network (router) or the Internet.
One symptom is the dashboard stops updating, but the graphs continue to update.
To resolve this issue:
- Reboot your device:
– Remove AC power
– Wait 10 seconds
– Plug AC power back in - Roboot your router (remove and reconnect AC power).
- Give it time for your network to resolve the DNS cache issue.
- If the problem persists, restore your device to factory default per the use manual.
The reasons we updated hosting services:
- We moved to a service that provides for a static IP address. This means no more DNS issues in the future.
- The new hosting service is faster, better supported with tools, and scalable to the rapid growth of users.
User Manual (required):
Download the current User Manual for the IPObserver Module. ObserverIP User Manual
IP Tools (required):
The IP Scan Tool is required to find the IP address of the ObserverIP Module on your network, so you can program the IP Module with your web browser. It also allows you to update the firmware. Windows IP Tool (64 bit) Windows IP Tool (32 bit)
* Most computers since 2004 are 64 bit.
Scan Tools:
Alternately, you can download a scan tool to find the ObserverIP on your network. The MAC address is printed on the bottom of the ObserverIP module and is addressable with a scan tool. Apple IP Scan Tool for iPhone, iPad, and iPod Touch
 Apple IP Scan Tool
 Linux IP Scan Tool
 Android IP Scan Tool
Wunderground.com:

Wunderground.com Weather applications for your computer, phone and tablet
ObserverIP Firmware Updates:
NOTE**: You must own a PC or Mac to update the firmware. Sorry, Linux products are currently not supported. Ambient Weather will update your ObserverIP at no cost (appropriate shipping charges will apply). Please fill out our Warranty Return form and mention you need the Observerip Firmware updated: https://ambientweather.com/reandex.html
In order to stay up to date with the latest Ambient Weather firmware or app updates, sign up for email notifications below. This way, you'll always be notified when a new update is available for your station or app.
... Permalink
If you have not done so already, download IPTools to your PC or Mac:
Ambient Weather ObserverIP Download Center
Launch IPTools, go the IP address of your module:

Select Search and Open.
... PermalinkIf you cannot connect to the ObserverIP module, and the IP address in IPTools reads 192.168.0.99 all of the time, please perform a factory reset of the console.
To restore the ObserverIP module to factory default, press the Reset pinhole button on the back of the module (#9, figure below).

Restart IPTools, and it should find a valid IP address on your network.
... Permalink- Power down and up the ObserverIP Module and wait a few minutes. If the problem persists:
- Reference the Weather Network panel on the ObserverIP module:

- Make certain you entered the correct MAC on the AmbientWeather.net Devices panel:https://ambientweather.net/devices
- You must be running Firmware Version 4.0 or greater. To upgrade the firmware, please reference:How Do I Update The Firmware For The ObserverIP Module?
If the problem persists, email a snapshot of the above panel to support@ambientweather.com
... PermalinkIf the time is incorrect on the ObserverIP Live Data panel, the Time Zone is set incorrecty.
To change the Time Zone, from your OberverIP Module User Interface, change the Time Zone on the Station Settings page.
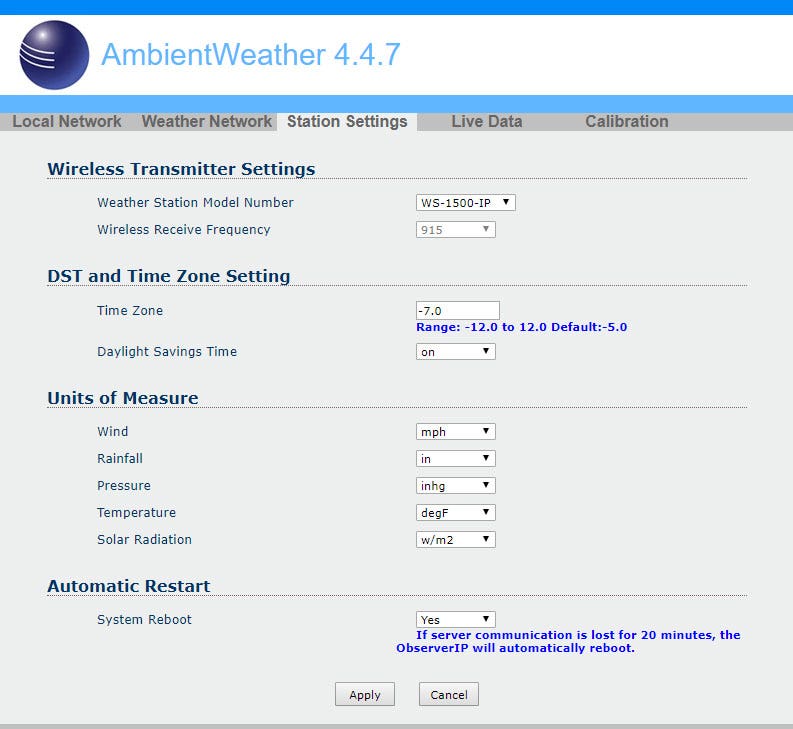
The following table provides times zones throughout the world. Locations in the eastern hemisphere are positive, and locations in the western hemisphere are negative.
| Hours from GMT | Time Zone | Cities |
| -12 | IDLW: International Date Line West | — |
| -11 | NT: Nome | Nome, AK |
| -10 | AHST: Alaska-Hawaii Standard CAT: Central Alaska HST: Hawaii Standard |
Honolulu, HI |
| -9 | YST: Yukon Standard | Yukon Territory |
| -8 | PST: Pacific Standard | Los Angeles, CA, USA |
| -7 | MST: Mountain Standard | Denver, CO, USA |
| -6 | CST: Central Standard | Chicago, IL, USA |
| -5 | EST: Eastern Standard | New York, NY, USA |
| -4 | AST: Atlantic Standard | Caracas |
| -3 | — | São Paulo, Brazil |
| -2 | AT: Azores | Azores, Cape Verde Islands |
| -1 | WAT: West Africa | — |
| 0 | GMT: Greenwich Mean WET: Western European |
London, England |
| 1 | CET: Central European | Paris, France |
| 2 | EET: Eastern European | Athens, Greece |
| 3 | BT: Baghdad | Moscow, Russia |
| 4 | — | Abu Dhabi, UAE |
| 5 | — | Tashkent |
| 6 | — | Astana |
| 7 | — | Bangkok |
| 8 | CCT: China Coast | Bejing |
| 9 | JST: Japan Standard | Tokyo |
| 10 | GST: Guam Standard | Sydney |
| 11 | — | Magadan |
| 12 | IDLE: International Date Line East NZST: New Zealand Standard |
Wellington, New Zealand |
If the ObserverIP Module web interface slows down, power down and up the device by removing the AC power, wait about 5 seconds, and connect AC power.
If you also own a WeatherBridge, or scrape the live data panel for another application, please read:
... PermalinkObserverIP Module slows down or stops working when connected to a WeatherBridge (MeteoBridge).
To view or change the weather station model or type, Select Station Settings from the ObserverIP interface (launch IP Tools to find the IP address).
o find the IP address).
... PermalinkNo, it is not possible to access the ObserverIP module outside of your local network.
It reads and writes (https://) Port 80, and does not use Telnet (Port 23) for example.
It is not possible to access the rest of your network(s) from the ObserverIP module.
... PermalinkIf both AmbientWeather.net and WeatherUnderground.com stopped updating:
- Power down and up the router.
- Power down and up the ObserverIP Module.
- If the problem persists, make sure the ObserverIP module is plugged directly into your router, and not through a switch.
Observer IP Module : Input 5V DC; 6.5′ 110-240V 50-60 Hz wall charger included.
DC barrel connector dimensions: 7.5mm ( L ) x 4.2mm ( OUT D) x 1.3mm ( Inner D)
... PermalinkIf the ObserverIP module MAC address reads 00:00:00:00:00:00, the ObserverIP module is defective and requires replacing.
We have a one year warranty here: www.AmbientWeather.com/rma.html
If out of warranty, the console is available here for purchase:
https://www.ambientweather.com/amobserverip.html

You must own a PC or Mac to update the firmware. Sorry, Linux products are currently not supported. Ambient Weather will update your ObserverIP at no cost (appropriate shipping charges will apply). Please fill out our Warranty Return form and mention you need the Observerip Firmware updated: https://ambientweather.com/reandex.html
... PermalinkIf you cannot upgrade your firmware, Only Power, Link and ACT lights are on, your ObserverIP module may be “bricked”.
- Note for Windows (Mac users can proceed directly to #2:To update the firmware, you may be required to turn off the firewall settings for the IPTools program (IPSE).Open Windows Firewall by clicking the Start button Picture at the bottom left hand corner of Windows, clicking Control Panel, clicking Security Center, and then clicking Windows Firewall.Click Change Settings and the Exceptions tab, and check all instances of IPSE as an exception to allow the program to communicate through the windows firewall. Press OK to save changes.

- Make sure your PC and OberverIP are connected to the same router prior to upgrading the firmware (avoid WiFi connectivity if you can).
- If you have not done so already, download the latest IP Tools and firmware here:http://www.ambientweather.com/observerip.html
- Run IPtools from your desktop.

- Select Search. Even if the device cannot be found, you can still upgrade the firmware. If the device is found, select the device and choose the Upgrade button.
- Select File and browse to the location on your computer where you downloaded the firmware.
Select the Upgrade Firmware button. The following will be displayed:DHCP server @ 192.168.0.xxx is running on UDP port 67 successfully.
TFTP server @ 192.168.0.xxx is running on UDP port 69 successfully. - The status bar will reach 100% if properly upgraded.

- Press Exit once completed.
- Press the reset button on the back of the IP Module.
- The IP Module will reboot. Press Search until the module is available again on your network.
- Re-enter your Station Type in the Station Settings panel.
- Re-enter your Weather Underground.com Station ID and Station Key in the Weather Network panel.
- If the procedure is unsuccessful, visit: www.AmbientWeather.com/rma.html and we will update the module for you.
If AmbientWeather.net stops reporting but WeatherUnderground.com continues to update, power down and up your IP Module. There may have been a DNS server change that was not updated on the IP Module.
... PermalinkTo restore the ObserverIP module to factory default, press the Reset pinhole button on the back of the module (#9, figure below).

To calibrate the rain gauge, select the Calibration panel from your IP Module:

The calibration parameter is a gain, where:
Calibrated Rain = Gain x Measured Rain.
For example, if you wish to add 10% to the measured rain, the gain is set to 1.10.
... Permalink- If you recently updated your firmware, you will need to re-enter your Weather Underground Station ID and Station Key.
- Power down and up your IP Module and wait a few minutes. If the problem persists:
- Go to the Weather Network panel on your ObserverIP Module:

- Make sure that you did not enter a space on the end of your station ID or station key. It is easy to do, especially if you Copy and Paste from the Wunderground.com website.
- Make sure the station ID and station key are entered properly. The station ID and key will be cleared if the reset button is pressed on the back of the back of the IP Module.
- It is easy to confuse the lower case letter l, upper case I and the number 1, as well as the number 0 and the letter O.
- If the problem persists, factory reset your IP Module. You will need to re-enter all of the user settings again. Here is a guide:How Do I Reset The ObserverIP Module To Factory Reset?
To calibrate the relative pressure, select the Calibration panel from your IP Module:

The following is an example of calibrating the relative pressure. Your results will vary.
- The local relative pressure from TV, the newspaper or the internet for the official station in your area is 30.12 inHg.
- From the Live Data panel, your absolute pressure (measured, and not corrected to sea-level) reads 28.90 inHg.
- Reference Figure 35. Enter the following offset in the Calibration panel for Relative Pressure Offset:
Relative Pressure Offset = 30.12 – 28.90 = 1.22
... PermalinkTo adjust the rain increments or rain totals, reference the Live Data Panel:

and enter the new rain totals for Daily, Weekly, Monthly and Yearly Rain.
... PermalinkYes, you can pull real time data from the ObserverIP over a local area network.
This is done from the LiveData panel on your IP Module:

If you are a programmer, the html can also be “scraped” and parsed. Here is an example of the html code:
<!DOCTYPE html PUBLIC “-//W3C//DTD XHTML 1.0 Transitional//EN” “http://www.w3.org/TR/xhtml1/DTD/xhtml1-transitional.dtd”>
<html xmlns=”http://www.w3.org/1999/xhtml”>
<head>
<meta http-equiv=”Content-Type” content=”text/html; charset=utf-8″ />
<title>LiveData</title>
<link href=”axcss0.css” rel=”stylesheet” type=”text/css” />
</head>
<body>
<table width=”800″ border=”0″ align=”center” cellpadding=”0″ cellspacing=”0″>
<tr>
<td colspan=”2″ align=”right” bgcolor=”#0088F7″> </td>
</tr>
<tr>
<td colspan=”2″ bgcolor=”#FFFFFF”><table border=”0″ cellpadding=”0″ cellspacing=”0″>
<tr>
<td width=”20″ height = “80”> </td>
<td ><img src=”img/1.jpg” width=”74″ height=”80″ ></td>
<td width=”10″> </td>
<td class=”txtstyle_1″ >AmbientWeather 4.4 </td>
</tr>
</table></td>
</tr>
<tr>
<td colspan=”2″ align=”right” bgcolor=”#60B7FF”><table border=”0″ cellpadding=”0″ cellspacing=”0″>
<tr>
<td width=”120″ align=”center”><font color=”#FFFFFF” face=”Arial, Helvetica, sans-serif”><em>AmbientWeather 4.4.2</em></font></td>
</tr>
</table></td>
</tr>
<tr>
<td colspan=”2″ align=”left” bgcolor=”#C0C0C0″>
<table width=”20″ border=”0″ cellpadding=”0″ cellspacing=”0″>
<tr>
<td bgcolor=”#C0C0C0″><div class=”menuitem_1″><a href=”bscsetting.htm”>Local Network</a></div></td>
<td bgcolor=”#C0C0C0″><div class=”menuitem_1″><a href=”weather.htm”>Weather Network</a></div></td>
<td bgcolor=”#C0C0C0″><div class=”menuitem_1″><a href=”station.htm”>Station Settings</a></div></td>
<td bgcolor=”#EDEFEF”><div class=”menuitem_1″><a href=”livedata.htm”>Live Data</a></div></td>
<td bgcolor=”#C0C0C0″><div class=”menuitem_1″><a href=”correction.htm”>Calibration</a></div></td>
</tr>
</table>
</td>
</tr>
<form name=”livedata” method=”POST” onsubmit=”return chkForm(0);”>
<tr>
<td colspan=”2″ bgcolor=”#EDEFEF”> </td>
</tr>
<tr>
<td colspan=”2″ bgcolor=”#EDEFEF”><div class=”subitem_1″>Live Data</div></td>
</tr>
<tr>
<td width=”448″ bgcolor=”#EDEFEF”><div class=”item_1″>Receiver Time:</div></td>
<td width=”352″ bgcolor=”#EDEFEF”>
<input name=”CurrTime” disabled=”disabled” type=”text” class=”item_2″ style=”WIDTH: 120px” value=”14:59 5/15/2018″ maxlength=”16″/></td>
</tr>
<tr>
<td width=”448″ bgcolor=”#EDEFEF”><div class=”item_1″>Indoor Sensor ID and Battery </div></td>
<td width=”352″ bgcolor=”#EDEFEF”>
<input name=”IndoorID” disabled=”disabled” type=”text” class=”item_2″ style=”WIDTH: 80px” value=”0x1f” maxlength=”5″ />
<input name=”inBattSta” disabled=”disabled” type=”text” class=”item_2″ style=”WIDTH: 100px” value=”Normal” maxlength=”12″ />
</td>
</tr>
<tr>
<td bgcolor=”#EDEFEF”><div class=”item_1″>Outdoor Sensor ID and Battery</div></td>
<td bgcolor=”#EDEFEF”>
<input name=”Outdoor1ID” disabled=”disabled” type=”text” class=”item_2″ style=”WIDTH: 80px” value=”0x0d” maxlength=”5″ />
<input name=”outBattSta1″ disabled=”disabled” type=”text” class=”item_2″ style=”WIDTH: 100px” value=”Normal” maxlength=”12″ />
</td>
</tr>
<tr>
<td bgcolor=”#EDEFEF”><div class=”item_1″>Outdoor2 Sensor ID and Battery</div></td>
<td bgcolor=”#EDEFEF”>
<input name=”Outdoor2ID” disabled=”disabled” type=”text” class=”item_2″ style=”WIDTH: 80px” value=”0x–” maxlength=”5″ />
<input name=”outBattSta2″ disabled=”disabled” type=”text” class=”item_2″ style=”WIDTH: 100px” value=”- -” maxlength=”12″ />
</td>
</tr>
<tr>
<td bgcolor=”#EDEFEF”><div class=”item_1″>Indoor Temperature</div></td>
<td bgcolor=”#EDEFEF”><input name=”inTemp” disabled=”disabled” type=”text” class=”item_2″ style=”WIDTH: 80px” value=”78.1″ maxlength=”5″ /></td>
</tr>
<tr>
<td bgcolor=”#EDEFEF”><div class=”item_1″>Indoor Humidity</div></td>
<td bgcolor=”#EDEFEF”><input name=”inHumi” disabled=”disabled” type=”text” class=”item_2″ style=”WIDTH: 80px” value=”24″ maxlength=”3″ /></td>
</tr>
<tr>
<td bgcolor=”#EDEFEF”><div class=”item_1″>Absolute Pressure </div></td>
<td bgcolor=”#EDEFEF”><input name=”AbsPress” disabled=”disabled” type=”text” class=”item_2″ style=”WIDTH: 80px” value=”28.65″ maxlength=”6″ /></td>
</tr>
<tr>
<td bgcolor=”#EDEFEF”><div class=”item_1″>Relative Pressure </div></td>
<td bgcolor=”#EDEFEF”><input name=”RelPress” disabled=”disabled” type=”text” class=”item_2″ style=”WIDTH: 80px” value=”30.06″ maxlength=”6″ /></td>
</tr>
<tr>
<td bgcolor=”#EDEFEF”><div class=”item_1″>Outdoor Temperature</div></td>
<td bgcolor=”#EDEFEF”><input name=”outTemp” disabled=”disabled” type=”text” class=”item_2″ style=”WIDTH: 80px” value=”86.7″ maxlength=”5″ /></td>
</tr>
<tr>
<td bgcolor=”#EDEFEF”><div class=”item_1″>Outdoor Humidity </div></td>
<td bgcolor=”#EDEFEF”><input name=”outHumi” disabled=”disabled” type=”text” class=”item_2″ style=”WIDTH: 80px” value=”16″ maxlength=”3″ /></td>
</tr>
<tr>
<td bgcolor=”#EDEFEF”><div class=”item_1″>Wind Direction </div></td>
<td bgcolor=”#EDEFEF”><input name=”windir” disabled=”disabled” type=”text” class=”item_2″ style=”WIDTH: 80px” value=”25″ maxlength=”5″ /></td>
</tr>
<tr>
<td bgcolor=”#EDEFEF”><div class=”item_1″>Wind Speed </div></td>
<td bgcolor=”#EDEFEF”><input name=”avgwind” disabled=”disabled” type=”text” class=”item_2″ style=”WIDTH: 80px” value=”1.8″ maxlength=”5″ /></td>
</tr>
<tr>
<td bgcolor=”#EDEFEF”><div class=”item_1″>Wind Gust </div></td>
<td bgcolor=”#EDEFEF”><input name=”gustspeed” disabled=”disabled” type=”text” class=”item_2″ style=”WIDTH: 80px” value=”4.9″ maxlength=”5″ /></td>
</tr>
<tr>
<td bgcolor=”#EDEFEF”><div class=”item_1″>Max Daily Gust </div></td>
<td bgcolor=”#EDEFEF”><input name=”dailygust” disabled=”disabled” type=”text” class=”item_2″ style=”WIDTH: 80px” value=”15.0″ maxlength=”5″ /></td>
</tr>
<tr>
<td bgcolor=”#EDEFEF”><div class=”item_1″>Solar Radiation </div></td>
<td bgcolor=”#EDEFEF”><input name=”solarrad” disabled=”disabled” type=”text” class=”item_2″ style=”WIDTH: 80px” value=”766.43″ maxlength=”12″ /></td>
</tr>
<tr>
<td bgcolor=”#EDEFEF”><div class=”item_1″>UV </div></td>
<td bgcolor=”#EDEFEF”><input name=”uv” disabled=”disabled” type=”text” class=”item_2″ style=”WIDTH: 80px” value=”2734″ maxlength=”12″></td>
</tr>
<tr>
<td bgcolor=”#EDEFEF”><div class=”item_1″>UVI </div></td>
<td bgcolor=”#EDEFEF”><input name=”uvi” disabled=”disabled” type=”text” class=”item_2″ style=”WIDTH: 80px” value=”7″ maxlength=”3″></td>
</tr>
<tr>
<td bgcolor=”#EDEFEF”><div class=”item_1″>Hourly Rain Rate</div></td>
<td bgcolor=”#EDEFEF”><input name=”rainofhourly” disabled=”disabled” type=”text” class=”item_2″ style=”WIDTH: 80px” value=”0.00″ maxlength=”8″ /></td>
</tr>
<form name=”Rain_1″ method=”POST” onsubmit=”return chkForm(0);”>
<tr>
<td bgcolor=”#EDEFEF”><div class=”item_1″>Daily Rain</div></td>
<td bgcolor=”#EDEFEF”><input name=”rainofdaily” type=”text” class=”item_2″ style=”WIDTH: 80px” value=”0.00″ maxlength=”8″ />
<span id=”rainofdaily_msg” class=”errMsg0″></span></td>
</tr>
<tr>
<td bgcolor=”#EDEFEF”><div class=”item_1″>Weekly Rain</div></td>
<td bgcolor=”#EDEFEF”><input name=”rainofweekly” type=”text” class=”item_2″ style=”WIDTH: 80px” value=”0.00″ maxlength=”8″ />
<span id=”rainofweekly_msg” class=”errMsg0″></span></td>
</tr>
<tr>
<td bgcolor=”#EDEFEF”><div class=”item_1″>Monthly Rain</div></td>
<td bgcolor=”#EDEFEF”><input name=”rainofmonthly” type=”text” class=”item_2″ style=”WIDTH: 80px” value=”0.00″ maxlength=”8″ />
<span id=”rainofmonthly_msg” class=”errMsg0″></span></td>
</tr>
<tr>
<td bgcolor=”#EDEFEF”><div class=”item_1″>Yearly Rain</div></td>
<td bgcolor=”#EDEFEF”><input name=”rainofyearly” type=”text” class=”item_2″ style=”WIDTH: 80px” value=”0.00″ maxlength=”8″ />
<span id=”rainofyearly_msg” class=”errMsg0″></span></td>
</tr>
<tr>
<td colspan=”2″ bgcolor=”#EDEFEF”> </td>
</tr>
<tr align=”center”>
<td colspan=”2″ bgcolor=”#EDEFEF”><input name=”Apply” type=”submit” class=”item_2″ style=”WIDTH: 60px; HEIGHT: 24px;” onclick=”setSubmitType(1)” value=”Apply” />
<input name=”Cancel” type=”reset” class=”item_2″ style=”WIDTH: 60px; HEIGHT: 24px;” value=”Cancel” /></td>
</tr>
</form>
<tr>
<td colspan=”2″ bgcolor=”#EDEFEF”> </td>
</tr>
<tr>
<td colspan=”2″ align=”center” bgcolor=”#EDEFEF”>
<input name=”rain_Default” type=”button” class=”item_2″ style=”WIDTH: 110px; HEIGHT: 24px;” onclick=”raindef()” value=”Rain Reset”>
<input id=”refresh_st” type=”button” class=”item_4″ style=”WIDTH: 110px; HEIGHT: 24px;” onclick=”uiCtrl(this.value);” value=”Refresh” />
<input id=”refresh_sp” type=”button” class=”item_2″ style=”WIDTH: 110px; HEIGHT: 24px;” onclick=”uiCtrl(this.value);” value=”Stop Refresh” />
</td>
</tr>
</form>
<tr>
<td colspan=”2″ bgcolor=”#EDEFEF”> </td>
</tr>
<tr>
<td colspan=”2″ bgcolor=”#C0C0C0″> </td>
</tr>
</table>
<script src=”axjs0.js” type=”text/javascript”></script>
<script language=”JavaScript” type=”text/javascript”>
<!–
var rfTaskRuningFlag = 0, rfTimeId;
uiCtrl(‘Refresh’);
function uiCtrl(uiCmd)
{
if (uiCmd==’Refresh’){
document.getElementById(‘refresh_st’).disabled = true;
document.getElementById(‘refresh_sp’).disabled = false;
rfTaskRuningFlag = 1;
rfTaskState = 0;
rfTimeId = setInterval(“ss()”, 16000);
}else if (uiCmd==’Stop Refresh’){
document.getElementById(‘refresh_st’).disabled = false;
document.getElementById(‘refresh_sp’).disabled = true;
rfTaskRuningFlag = 0;
clearInterval(rfTimeId);
}
}
function ss()
{
if (rfTaskRuningFlag)
{
window.location.reload();
}
}
–>
</script>
</body>
</html>
Yes, the ObserverIP communicates to the same sensors as models WS-1001-WiFi, WS-1002-WiFi, WS-1200 and WS-1201 weather stations.
The ObserverIP connects directly into your router and you communicate over your Local Area Network with a PC to set it up.
Some reasons why you may want to upgrade:
- You are having issues with the WiFi (WS-1001-WiFi, WS-1002-WiFi),
- You want to add Internet connectivity to your existing station (WS-1200, WS-1201).
- You want to connect to a WeatherBridge, which supports all of the major cloud services. For details, visit:
Can I Use My Observer Or Osprey Sensor Array To Communicate With A WeatherBridge? I Want To Report To CWOP, PWSWeather And More.
Available here: https://www.ambientweather.com/amobserverip.html
... PermalinkThe issue with the ObserverIP Module continuously rebooting appears to be a combination of two things:
- It occurs with Firmware Versions 4.4.1 and 4.4.2. Upgrading to 4.4.4 or greater fixes the problem.
- It is becoming more prevalent around June 2018.
To upgrade your IP Module:
- Download Version 4.4.4 from this link:
https://p10.secure.hostingprod.com/@site.ambientweatherstore.com/ssl/iptools/ambient_v4.4.4.bin
Make a note of where the file went on your computer. You will need this file to upgrade through the IPTools.
- Replace the batteries.We recommend Energizer Lithium Ultimate batteries like the following:https://www.amazon.com/Energizer-Ultimate-Lithium-Batteries-Each/dp/B00003IEMEhave a wide temperature operating range. They operate between -40 degF and 140 degF. Alkaline batteries only operate to about +10 degF. Rechargeable batteries often have a limited life and mean constant replacing, as well as a narrow temperature range.
- If the problem persists, the sensor array needs replacing. We have a one year warranty.Please visit: www.AmbientWeather.com/rma.htmlIf out of warranty, the sensor array can be replacedhttps://www.ambientweather.com/amws1002array.html
If your ObserverIP module slows down or stops working and you also connect it to the WeatherBridge:
- Make sure you are running the latest firmware. For details, please visit:
- If you are reporting to Wunderground.com and AmbientWeather.net, turn off this feature on the ObserverIP and use the WeatherBridge to send the data.
If your weather station only updates briefly on the Internet and then stops:
- Plug the ObserverIP module directly into your router and not a switch.
- Power down and up your router and the ObserverIP Module.
Launch IPTools, go the IP address of your module:

Select Search and Open.
Tap the Live Data tab to view your real time data.

If the ObserverIP Module does not power up (no lights):
The issue may be with the AC adapter. Measure the output voltage of the AC adapter, and it should be about 5 Volts.
If the AC adapter is not registering a voltage, we have a one year warranty here: www.AmbientWeather.com/rma.html
If out of warranty. the AC adapter is available here for purchase: https://www.ambientweather.com/amobserveripac.html
If the voltage is fine, the console needs replacing, we have a one year warranty here: www.AmbientWeather.com/rma.html
If out of warranty, the console is available here for purchase:
https://www.ambientweather.com/amobserverip.html
... PermalinkTo change the rain totals in the ObserverIP Module, select the Live Data panel, and enter the rain totals for daily, weekly, monthly, and yearly totals.
![]()
The console may be less subject to interference (RF or EMI) than the ObserverIP Module.
- Move the IP Module as far away from radiating sources, such as the router itself, other electronic equipment and it’s own AC adapter.
- Try reorienting the IP Module 90 degrees.
- If the problem persists, the IP Module may need replacing.
We have a one year warranty. To replace under warranty, please visit:
www.AmbientWeather.com/rma.html - For out of warranty replacement, visit:
https://www.ambientweather.com/amobserverip.html
I am able to connect to the ObserverIP admin screen but not able to report to AmbientWeather.net or Weather Undergroud.
Please check your routers outbound logs to make sure AmbientWeather.net http://107.170.198.71/ is not being blocked. Also check that you configure your network settings to use the IP addresses 8.8.8.8(primary) and 8.8.4.4(secondary) as your DNS servers
... PermalinkUser Manual (required):
Download the current User Manual for the IPObserver Module.ObserverIP2.0 User Manual
IP Tools (required):
The IP Scan Tool is required to find the IP address of the ObserverIP Module on your network, so you can program the IP Module with your web browser. It also allows you to update the firmware.Windows IP Tool (64 bit) Windows IP Tool (32 bit)
* Most computers since 2004 are 64 bit.
Scan Tools:
Alternately, you can download a scan tool to find the ObserverIP on your network. The MAC address is printed on the bottom of the ObserverIP module and is addressable with a scan tool.Apple IP Scan Tool for iPhone, iPad, and iPod TouchApple IP Scan Tool
Wunderground.com:
Wunderground.com Weather applications for your computer, phone and tablet
ObserverIP2.0 Firmware Updates:
ObserverIP2.0 Firmware Download
NOTE**: You must own a PC or Mac to update the firmware. Sorry, Linux products are currently not supported. Ambient Weather will update your ObserverIP at no cost (appropriate shipping charges will apply). Please fill out our Warranty Return form and mention you need the Observerip Firmware updated: https://ambientweather.com/reandex.html
In order to stay up to date with the latest Ambient Weather firmware or app updates, sign up for email notifications below. This way, you'll always be notified when a new update is available for your station or app.
... Permalink
Latest Version: 2.2.2
- Fixed rain event reporting issue
- Updated sensor names on Sensors ID page
- Updated network name in Network & Internet Settings
History:
... Permalink


